40191
The Complete Recording Studio Equipment List

Description
Module Information
Description
No tags specified
Show more
While beginners always have that natural desire to want to learn everything, right away…
The truth is…you really only need a few items to get started.
And anything more will probably just confuse you.
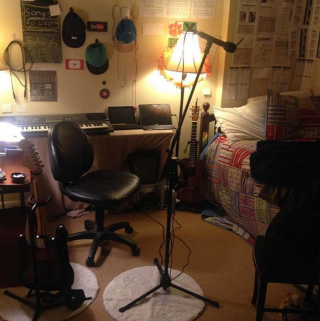
So if you don’t have a studio yet, a simple bedroom studio is the first milestone to aim for.
And for a setup like this, you need the following 9 items:
Computer
DAW
Audio Interface
Microphones
Headphones
Studio Monitors
Cables
Microphone Stands
Pop Filter
Now let’s look at each one in more detail…
1. Computer
These days, since recording studios are almost ALL digital…
The first thing you obviously need is a computer.
And while you can just use any old computer, at-first…
You should eventually invest in the best one you can afford.
Because today’s DAW’s can be EXTREMELY hard on processing resources.
And making full-use of its features requires a blazing-fast computer. So when you’re ready to upgrade, here’s what I recommend:
2. Digital Audio Workstation (DAW)
The digital audio workstation is the primary software used to record, edit, and mix music on your computer.
Originally designed to mimic look-and-feel of analog mixing boards from the pre-digital era…
Their visual design has remained basically the same ever since.
Pro Tools, which has long-been the most famous DAW, great for studios of all levels…but it is by no means the only option.
Depending on your budget and style of music, the best one for you could be any one of around 10 possible options.
To learn more about each one, check out this article:
The Ultimate Guide for DAW Software for 2017
3. Audio Interface
Once you’ve got the software, the next thing you’ll need is an audio interface…
Which has the primary purpose of providing all the necessary connections to send your music:
INTO the computer when recording, and…
OUT the computer during playback.
Originally, this was pretty much all they did…
But today’s modern interfaces have evolved into incorporate many other features as well. Those include:
digital conversion
mic preamps
DI boxes
headphone amps
monitor management
In pro studios, each of these items normally exist as high-end stand-alone units, organized within a rack.
In home studios though, these “all-in-one” budget interfaces can be a great way to save money, and still get exactly what you need.
To see which ones I recommend, check out this article:
The Ultimate Guide to Audio Interfaces for 2017
4. Microphones
The oldest item on this list by far…
Microphones have been around since long before recording studios ever existed.
Yet ironically, in all those years, very little about them has changed.
And many of the top models from a half-century ago are still among the industry standards of today.
That’s not to say that microphones are a simple topic, because it’s actually quite the opposite.
Recording studios typically carry several-dozen mics or more…each one used to achieve:
a different sound
from different instruments
in different situations
And in the following post, I give you the complete run-down on everything you should know about the topic:
The Beginner’s Guide to Recording Studio Microphone
5. Headphones
Unlike most studio gear, headphones are one item that we’re all thoroughly familiar with.
At least…that’s what most people assume.
But truth is, while you may own a great pair of “consumer” headphones…
For pro audio, there are 2 special types of studio headphones intended for 2 very specific tasks:
closed back headphones
open back headphones
And in this post, I reveal what they are, what they do, and which ones I recommend:
The Ultimate Guide to Studio Headphones for Home Recording
6. Studio Monitors
In the pro audio world, we call them either studio monitors, or nearfield monitors.
And while they might look similar to plain old speakers…THEY’RE NOT.
Compared to consumer speakers, which typically accentuate certain frequency bands in order to improve the listening experience for certain audiences…
Studio monitors are designed with the opposite goal of providing a perfectly FLAT frequency response, so engineers can hear a mix as it truly is, flaws and all…so they can adjust accordingly.
In pro studios, these monitors can often cost 10 grand or more.
But luckily for the rest of us, there are plenty of great affordable options as well. To see which ones I recommend, check out this article:
The 10 Best Studio Monitors for Home Recording
7. Cables
In a typical pro studio, you’re likely to find hundreds of cables…
With dozens of connectors that you’ve probably never even heard of.
And the time will come when you own more cables than you can count.
The good news is…in the beginning, all you need is 3:
One XLR cable to connect a mic to your audio interface.
And two more to connect the interface to your monitors.
For help finding these, check out this article:
The Ultimate Guide to XLR Mic Cables for Stage and Studio
Show less
Context
Description
No tags specified
Show more
After recording music in a simple bedroom studio for a few months…
You’ll probably start to notice a few things that bug the crap out of you.
Besides the fact that your workspace is extremely cramped…
Your biggest problem is probably that all your music sounds like it was recorded…well…in a bedroom!
And after doing some research to figure out what’s going wrong…
You will undoubtedly come to the conclusion that you now need a dedicated room for your studio…
Where you can cultivate both a creative environment that will improve your workflow, and an acoustic environment that will allow your recordings to at least sound semi-decent.
So when that time comes, here are the 8 KEY items you need:
Desk/Workstation
Studio Chairs
Bass Traps
Acoustic Panels
Diffusers
Reflection Filters
Monitor Isolation Pads
Studio Monitor Stands
Now let’s take a closer look at each one…
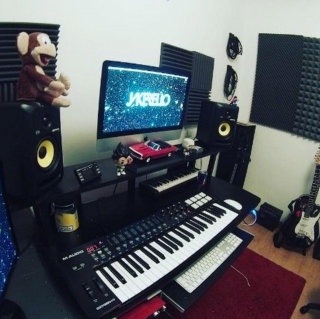
1. Desk/Workstation
In virtually any home studio, regardless of size or purpose…
The centerpiece of the room will undoubtedly be the desk.
So it makes sense then, that it be the very first item you add to your new room.
But don’t go overboard here. Because in the beginning, any desk you already have in your house can work just fine.
So you don’t have to spend a fortune on a custom mixing desk if you don’t want to.
However…
The truth is, at some point, you will want something better. And if that day is today, check out this post to see which ones I recommend:
The 6 Best Studio Mixing Desks for Home Recording
Classic Example:
Studio RTA Producer – (Amazon/GuitarC/MusiciansF/Thomann)
2. Studio Chairs
Just like with your desk…a high-end studio chair, while nice to have, is not a necessity.
Truthfully, a folding chair works just fine.
For a while…
But home studios having a curious way of consuming your entire life…
And it’s quite possible that at some point, you will spend more hours in that chair than you do in your bed.
In which case, a little bit of comfort and back support may not be a bad idea.
So to see which ones I recommend, check out this post:
The 6 Best Studio Chairs for Home Recording
3. Bass Traps
The fact is…that without some acoustic treatment in your room…
Chances are slim-to-none that you will have any chance at recording decent sound.
And the first type of acoustic treatment to add is…bass traps.
The reason they come first is because unlike other types of acoustic foam…
Bass traps offer broadband absorption across the entire frequency spectrum, and are particularly good at absorbing lower frequencies…which cause the majority of problems in any studio, especially in smaller rooms.
And since it’s the most-important item, it makes sense to check it off your list first.
To learn more about bass traps, and see which ones I recommend, check out this post:
The Ultimate Guide to Bass Traps for Home Recording
Classic Example:
Auralex LENRD – (Amazon/GuitarC/MusiciansF/Thomann)
4. Acoustic Panels
While they don’t absorb bass frequencies very well…
Acoustic panels are great at absorbing frequencies in the low-mid to high range.
More importantly though…
They are particularly good at taming standing waves…
Which have a tendency to cause major acoustic problems in rooms with parallel walls, where sound reflections bounce back-and-forth in the same spot.
In typical home studios, where the room is likely to be cubical, standing waves are especially problematic, which is why acoustic panels are a must-have.
To see which ones I recommend, and how to put them up, check out this post:
The Ultimate Guide to Acoustic Foam Panels for Home Recording
Classic Example:
Auralex Studiofoam – (Amazon/GuitarC/MusiciansF/Thomann)
5. Diffusers
The final item to add to add to your room is…diffusers.
In pro studios, with big budgets and big rooms…
Diffusion is an important element of their acoustic treatment plan because creates a nice natural ambience without removing too much of the “liveliness” from the room.
Diffusers do this by scattering whatever sound energy exists in the room…
Allowing all frequencies to disperse randomly, rather than build up unnaturally in certain spots.
Common wisdom states though, that diffusion is significantly less effective in smaller rooms.
And since diffusers can get quite expensive, most home studios will elect to not use them. However, the choice is completely up to you.
Classic Example:
Auralex T’Fusor – (Amazon/Thomann)
6. Reflection Filters
While “real” acoustic treatment will always be ideal…
Often times, it’s simply too expensive for a small project studio.
In which case, reflection filters offer a workable alternative.
Intended mainly for vocal recording, this device allows you to skip the hassle of treating your entire studio…
By instead capturing sound reflections before they ever enter the room.
While noticeably less effective than “proper” acoustic treatment, they’re still way better than nothing-at-all…
And they can even be ideal for simple bedroom studios that only do vocals.
To see which ones I recommend, check out this post:
The 6 Best Reflection Filters for Recording Vocals
Classic Example:
sE Electronics Reflexion Filter PRO – (Amazon/GuitarC/MusiciansF/Thomann)
7. Monitor Isolation Pads
Once you’ve gotten the acoustic treatment part out of the way…
You can still improve your sound one step further with monitor isolation pads.
You see…by placing your studio monitors directly on the desk, sound vibrations transfer through the surface of the desk…
Which decreases the accuracy of the monitors themselves, and can even create new and unpredictable resonances from any other objects receiving those vibrations.
Monitor isolations pads solve this problem by creating a buffer of acoustic isolation between your monitors and desk, preventing any vibration from transferring.
Plus, some models even provide added options for positioning your monitors, by allowing you to tilt them at various angles.
To see which ones I recommend, check out this article:
The 6 Best Monitor Isolation Pads to Improve Your Sound
Classic Example:
Auralex Mopads – (Amazon/GuitarC/MusiciansF/Thomann)
8. Studio Monitor Stands
To take monitor positioning one step further…
A better option might be to use studio monitor stands instead.
Because rather than limit your positioning to the surface of your desk…
With stands…distance, height, and angle are fully adjustable, so you can move them wherever you like.
And they’re a big help, because to get the most accurate sound from your monitors, they need to be in very specific locations in relation to your ears.
To see a list of the top stands I recommend, check out this article:
The 7 Best Studio Monitor Stands for Home Recording
Classic Example:
Ultimate Support MS90 – (Amazon/GuitarC/MusiciansF/Thomann)
So that concludes STAGE 2.
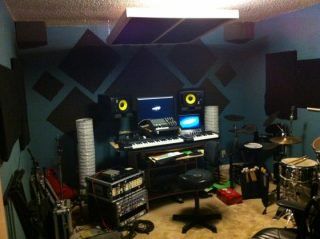
With the items we just covered, you should have a pretty awesome home studio by now.
And if you only plan on working by yourself in your studio, this may be all you ever need.
But when the day comes when you want to want to record other people, and possibly even charge them for your services, it’s time to graduate to…
Show less
Context
Description
No tags specified
Show more
he biggest problem with the studio we just set up…
Is that it only offers a limited number of input channels.
What this means is…it will be very difficult to record more than one person at a time…
And you certainly can’t record acoustic drums, which can easily require 8 or more mics depending on the size of the kit.
A studio of this caliber is fine for yourself and maybe one other person, but anything more and you’ll need some new gear.
The other issue with our current studio is speed/efficiency…
If you’re recording a lot, or you expect to charge clients by the hour…you should be able to work a relatively time-efficient manner. Which is harder to do without certain tools.
So if you’re ready…let’s begin with this new round of equipment:
Rack Mount
Power Conditioner
Microphone Preamp
Headphone Amp
Monitor Management
Virtual Instruments
MIDI Controller
Electronic Drum Kit
Control Surface
Software/Plugins
Snake Cable
Uninterruptible Power Supply
Direct Box
Now let’s look at each one in more detail…
1. Studio Rack Mounts
The final “BIG milestone” in the evolution of your home studio…
Is the inevitable addition of your first rack-mounted setup.
Because prior to this step, the simple desktop gear you’ve been using can only record a small number of simultaneous tracks.
And if you want to record bands (which most people eventually do) you need more channels.
The beauty of the “rack system” is…it allows you to mix-n-match your equipment, so you can customize your routing and signal flow however you like.
That way it can always do exactly what you need it to.
Of course, the first step in building any rack to buy the case itself. So check out this article to see which ones I recommend:
The Beginner’s Guide to Studio Rack Mounts for Home Recording
Classic Example: Raxxess Economy Rack
2. Power Conditioner
While every person’s rack setup will be entirely unique…
The one item common to virtually every rack is a power conditioner.
Because rather than having a half-dozen power cables sticking out the back of your rack from each unit…
A power conditioner consolidates power for the entire rack down to a single cable.
And as a HUGE side-benefit, it also filters the power using various technologies such as:
surge protection
voltage regulation
noise filtration
Which extends the life of your gear, and allows it to always perform at its best.
To see which ones I recommend, check out this post:
The 7 Best Power Conditioners to Safeguard Your Equipment
Classic Example:
Furman M-8×2 – (Amazon/GuitarC/MusiciansF)
3. Microphone Preamp
Now that the rack and the power is taken care of…
You’re finally ready for those extra input channels we’ve been talking about…
Which you will get by adding a multi-channel microphone preamp to your setup.
Another common variety of this device is the high-end single-channel mic preamp, which studios often use on vocals or any other particularly important track in a mix.
To see which models I recommend for both single and multi-channel preamps, check out this article:
The 9 Best Microphone Preamps for Home Recording
Classic Example:
Presonus Digimax D8 – (Amazon/GuitarC/MusiciansF)
NOTE: Whenever buying a multi-channel preamp, you must also make sure that you audio interface has enough line inputs to accommodate the extra channels.
If yours doesn’t…check out the audio interface post again to find one that does.
4. Headphone Amp
Once you have plenty of input channels to work with…
The next thing you’ll need is a few more OUTPUT channels.
First, so that when you work with multiple musicians…
Each person can monitor themselves as they perform.
Since most audio interfaces have only 1-2 headphone outputs…you’ll need a headphone amp if you want more.
Typical headphone amps offer stereo outs for anywhere from 4-8 sets of headphones.
Advanced headphone amps…can send multiple tracks of audio to personal mixers for each musician, allowing them to individually control exactly what they want to hear, without affecting what is heard by everyone else.
And in studios that can afford one, this added functionality can make the entire recording process much easier for everyone involved.
To see which ones I recommend, check out this article:
The 7 Best Headphone Amps for Home Recording
Classic Example:
Presonus HP4 – (Amazon/GuitarC/MusiciansF/Thomann)
5. Monitor Management
Now that you’ve got plenty of output channels for headphones…
The next thing you may want to add is some extra outputs for multiple studio monitors.
And here’s why:
Sometimes in advanced studios, engineers need to compare how their mixes sound over a variety of playback devices.
That way, when their work is heard through cheaper “consumer” speakers…
They can be confident that it sounds just as awesome as it does in the studio.
To accomplish this task, a tool known as a monitor management system is used…
Which allows engineers to switch back and forth between different speakers with the push of a button.
If and when you ever need this in your studio, check out this article to see which ones I recommend:
The 6 Best Monitor Management Systems for Home Recording
Classic Example:
Mackie Big Knob – (Amazon/GuitarC/MusiciansF/Thomann)
6. Virtual Instruments
If you record mainly by yourself…
Then you already know how difficult it can be to play the part of “multi-instrumentalist“.
Not only do you have to be at least semi-proficient at a bunch of different instruments…
You need to actually OWN each of those instruments as well.
Which for many of us, is simply not possible. Home recording is expensive enough without having to buy a dozens of instruments as well.
The solution to this common problem is of course…virtual instruments.
With a single software bundle, you get access to hundreds of instrument sounds for less than the price of a single “real” instrument.
And while they can’t replicate every instrument (like guitar), they can sound surprisingly realistic on certain instruments (such as piano and drums).
Which is why for most people, what I recommend for starters is:
one good drum program, and…
one good keyboard/synth program.
And using just those two, you can accomplish a hell-of-a-lot.
Classic Example for Drums: Toontrack EZ Drummer
Classic Example for Keyboards: Spectrasonics Omnisphere
7. MIDI Controller
The biggest problem with virtual instruments is…
It SUCKS to play them on a computer keyboard and mouse. Not only is it no-fun…
it takes forever to program even a simple rhythm/melody, and…
the level of “feel” you can inject into a performance is minimal.
Because to truly add your own expressive touch, you need an actual “physical” instrument to control your “virtual” instrument.
And that’s where MIDI controllers come in…
While they aren’t perfect, they allow for at least some degree of expression, by giving you something real to touch with your hands.
To see which ones I recommend, check out this article:
The 8 Best MIDI Controllers for Home Recording
Classic Example:
M-Audio Axiom AIR mini – (Amazon/GuitarC/MusiciansF/Thomann)
8. Electronic Drum Kit
While virtual instrument drums might be good enough for some…
For drummers, probably not.
The problem is…while acoustic drums might be ideal, they simply aren’t practical for 99% of home studios.
But there’s good news…
Because electronic drum kits provide an excellent compromise between the “real” and the “virtual“.
Now if you haven’t played one in a few years, you may have a negative opinion of them based off the ones you might remember back in the 80’s.
However, in the 20-30 years since, they’ve gotten MUCH better.
Today, they can sound almost as good, and in some cases even better than a real acoustic kit. And for the home recording musician, that’s wonderful news.
If you’re interested, check out this article to see which ones I recommend:
The 8 Best Electronic Drum Kits of 2017
Classic Example:
Roland TD11 KV – (Amazon/GuitarC/MusiciansF/Thomann)
9. Control Surface
The stereotypical fantasy which initially sucks us into the world of recording is…
that vision of you…
in the control room…
Crafting your latest masterpiece on the massive analog mixing board of your million dollar studio.
Of course, it doesn’t take long to discover that the actual world of home recording is far less glamourous.
Because in this reality, mixing is usually done on a computer keyboard and mouse. Which to be honest…kinda sucks.
And not only does it look lame…
More importantly, it slows down your workflow, and makes it much harder to perform some of the more advanced mixing techniques, such as automation.
The solution to this problem is of course, a control surface, which is essentially a MIDI controller designed to mimic the look and feel of the analog boards from decades-past.
Only…in a much smaller package.
And while they aren’t a must-have item, they’re still pretty awesome. To see which ones I recommend, check out this post:
The 7 Best Control Surfaces for Home Recording
10. Software/Plugins
These days, virtually all DAW’s offer a bundle of free software plugins as part of their package.
And most of them aren’t half bad.
However, the fact is that top engineers will spend thousands of dollars on premium plugins…
Which are somehow better than the free ones.
And while beginners often make the mistake of believing that these premium plugins are a “magic pill” that will solve all their problems…
The truth is…that if your skills aren’t up to par, then no plugin in the world is gonna help.
However…
If you do have some skills, they can make a BIG difference. And I won’t even have to explain how…
Because you will hear it yourself.
To learn more about the different categories of software plugins available, check out this post:
The Ultimate Beginner’s Guide to Music Production Software
Classic Example:
Waves Gold Bundle – (Amazon/GuitarC/MusiciansF/Thomann)
11. Snake Cables
At this stage in the game, with the gear you now own…
It’s quite likely that your studio is looking pretty cluttered.
Cables everywhere…right?
Well once you reach this point, the standard solution to turn to is a snake cable like the one shown in the picture.
By combining several individual cables into one, snake cables allow you to dramatically clean up the look of your studio, and more importantly…
They keep your cables permanently organized, so never-again will you need to trace-back an entire length of cable through a tangled web just to find out where it leads.
The only problem is…most snakes are designed for much larger rigs than a typical home studio, and it can be difficult for beginners to find the right one for their purpose.
So for more info on this topic, check out this article:
The Beginner’s Guide to Snake Cables for Home Recording
Classic Example: Hosa Little Bro
12. Uninterruptible Power Supply (UPS)
Do you know what can happen during a recording session when the power goes out?
If your studio uses a desktop computer (instead of a laptop, which has batteries), and the computer SHUTS OFF improperly…
All of your work can potentially be LOST.
Which is why anytime a computer holds important data, it makes sense to use an uninturruptible power supply (UPS).
Essentially functioning as a back-up battery, a UPS gives you several minutes of power to shut down your computer safely in the event of a blackout.
Now unlike every other item on this list, which should be added in sequence…a UPS is one of those items you can add at virtually any time.
Some people get them early-on. Others never get them at all.
But here’s when I suggest you get one:
Once you’re at a point where you’re creating work you’re actually proud of, and that you’d be devastated if you’d lost…
It makes sense to buy a little “insurance” so you’re protected.
To learn more about UPS’s, check out this post:
The Average Joe’s Guide to Uninterruptible Power Supplies
Classic Example: APC BR700G
13. Direct Boxes
In the studio, where cables sometimes extend as long as a hundred feet to reach their destinations…
Guitar cables are especially susceptible to excessive signal noise.
And direct boxes solve this problem by taking an (unbalanced) instrument level signal, and converting it to a (balanced) mic level signal…
Which can then be sent for several hundreds of feet if necessary, while gathering virtually no noise at all.
Because of the fact that most audio interfaces and microphone preamps have at least 1 or 2 direct box channels built-in…
It’s possible you may never need a direct box.
However, if you need more DI inputs, or…if would like to add a guitar jack to a new location in your room…a stand-alone DI box could be exactly what you’re looking for.
To see which ones I recommend and why, check out this post:
The Ultimate Guide to Direct Boxes for Stage and Studio
Classic Example:
Radial J48 – (Amazon/GuitarC/MusiciansF/Thomann)
So we’ve finally reached the end of STAGE 3. At this point with the new additions we just covered, your studio should be good enough to record bands and possibly even charge clients for your services.
However…
If you aspire to actually turn your hobby into something resembling a full-time career, there’s still one more set of upgrades that remain…
Show less
Context
Description
No tags specified
Show more
For 99.9% of us, STAGE 3 will have been the final level of our journey.
Because the truth is…it’s extremely tough to be successful in the pro audio business.
And most of us aren’t really looking to be professionals anyway.
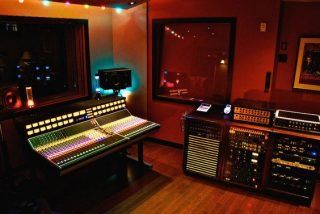
But since many of you are at least curious about it, I might as well give you a few examples of how pro studios differ from amateur ones.
So if you’re ready, here’s the final list of equipment for STAGE 4:
Digital Converters
Master Clocks
Analog Hardware
And here’s more about each one…
1. Digital Converters
Hidden within your audio interface, and many other devices in your studio…
Is a device known as a digital converter, that has 2 simple jobs:
converting analog audio into digital (A/D), and…
converting digital audio into analog (D/A).
The reason you may not have heard of it is…in 99% of cases, digital converters exist as a side-feature within some other device.
However…
In pro studios with big budgets, it’s common to find high-end stand-alone digital converters costing several thousand dollars each…
Which have no other function than to deliver the absolute best digital conversion money can buy.
Will it be the difference between a good mix and a bad one? Probably not.
But for professionals, every little advantage counts.
Classic Example: Lynx Aurora
2. Master Clocks
Another little-known device hidden within virtually every digital recording device is…
The master clock (aka word clock, aka digital clock).
Whenever you connect digital signals from two or more devices…
The individual digital “samples” must align perfectly in sync.
Otherwise the resulting audio will be filled with annoying “clicks” and “pops” from the misaligned samples.
In most setups, the audio interface clock defaults as the master, and the others as slaves. Meaning one clock leads, and the others follow.
However with more complex systems, it’s much easier to use a stand-alone digital master clock to lead the entire system.
And while there’s much debate about their impact on sound quality, some sources will tell you that a high-end master clock makes a noticeable difference.
Classic Example: Apogee Big Ben
3. Analog Hardware
Long before the days when mixing was done with software plugins…
Common tools like EQ and compression existed only as stand-alone hardware in a rack.
These days many of those units cost several thousand dollars each, and offer only 1 or 2 channels.
Classic Example: Universal Audio LA-2A
Now you might be wondering…
So wouldn’t I need dozens of those things just to mix a song?
Well the answer is…yes you would.
Luckily for us, we now live in an age where the modeled “digital versions” of these tools make our jobs both cheaper and easier…
Yet surprisingly…
Many of the world’s top studios still rely mainly on these ancient tools to get the job done. Because according to many of the best ears in the business…analog gear still sounds better than any plugin.
As such, many of us “normal” guys blow absurd amounts of cash on a single purchase that may (but probably won’t) be that one missing ingredient we’ve been searching for.
Would I recommend it in most cases? Not really. But I promise I won’t judge you if you buy one anyway.
Show less